Protect Your Site’s Content With MemberPress Content Protection Rules
Do you want to Protect Your Site’s Content for users with specific roles? If yes you can easily do it with the help of the MemberPress plugin. If you’re having a membership site, adding restrictions or locking your content for specific users can be beneficial for your business.
MemberPress plugin is an extremely effective and powerful membership plugin that enables you to restrict the content of the entire website or on specific pages and posts for specific users. In this blog, we will discuss how you can easily add MemberPress content protection rules to your membership site and in what ways they can benefit your business.
- Benefits of Membership Content Protection Rules
- Ways to use MemberPress Content Protection Rules
- Member specific rules
- Drips and expirations
- Advanced Rules
- Steps involved in adding MemberPress Content Protection Rules
- How to redirect unauthorized users to specific pages?
- Conclusion
Benefits of Membership Content Protection Rules
Publishing free content on your website is undoubtedly the best way to teach to a large audience and grow a strong customer base. However, it might not be always profitable for your business. It is strictly new content for the users with specific roles that can help you reward your committed members and also help you boost your profits and revenues. You can publish downloadable Ebooks, courses, and webinars on your website that is accessible only to your members.
You can launch membership content protection rules on your website using the MemberPress plugin. It helps you restrict content for the users of specific rules and also allows you to control who has the access to view your premium or exclusive content. Thus, it helps you foster your relationship with your committed members and also boost your revenues.
Ways to use MemberPress Content Protection Rules
To set up the member press content protection rules you have to go to a member press and click on the rules. Thereafter, go to the Content & Access section via the Protected Content drop-down. In the dropdown menu, you can see the following options
- All content- You can use the all content option to restrict the content on your whole website. However, you can easily add exceptions to this rule. To do so, go to the Except Field and enter the page URL on which you don’t want to restrict the content.
- Post categorized or post tagged- Using this option you can restrict the content having a specific post category or post tag.
- Single Post- This option will help you restrict the content on a specific post. To do so, you just have to enter the page ID in the specific in the relevant field.
- Custom URL- If you want to restrict some specific content such as downloadable E-books or webinars on your website you can easily add the URL or page ID in the relevant field to restrict the content.
- Custom post types- MemberPress also enables you to restrict the content on specific or custom posts.
You can use any of the aforementioned rules or a combination of these to protect your content.
Member specific rules
Using MemberPress, you can allow specific members to access your restricted content. This may include the users with specific membership licenses or the individual members. Using membership-specific rules, you can also allow individual users to access your exclusive content irrespective of the membership status.
By setting member-specific rules, you can always encourage your users to upgrade to a premium membership license to access your exclusive content. Thus, it helps you maximize your revenue and boost your profits.
Drips and expirations
The drips and expiration option helps you create time-bound deals and lets you release your content in a strategically planned way, thus attracting your audience towards your content.
Setting drips on your content means the content will be accessible to your users once they perform the specified task or action. For example, you can set that the content will be available to your users one day after they purchase your gold membership.
You can also set partial drip on your content which means your users will be able to view only a part of the content before they upgrade to the specified membership tier. This helps you attract users towards your exclusive content and thus, secure memberships. Using MemberPress, you can also set the time period for which the exclusive content will be available and accessible to the users after registration.
Advanced Rules
Using the MemberPress advanced Rules, you can restrict partial content i.e., using the plugin’s partial content code, you can restrict the part of the content be it widgets, images, or paragraphs. You can use the PHP widgets or the shortcodes to hide the part of the content.
Steps involved in adding MemberPress Content Protection Rules
- You can apply the MemberPress content protection rules in so many ways. However, the steps to apply the rule are more or less the same with all the options. For example, you want to restrict some specific content on your website for users with gold membership only. In this case, go to your WordPress dashboard and navigate to MemberPress. Thereafter go to the Rules tab and click on the add new button. Now, you will be able to see a section labeled Content & Access. In this section first, move to the protected content where you’ll see two fields with a drop-down menu. In the first field select “all content categorized” and in the second one select “gold”. You can do it for the other Membership levels as well.

Next, you have to move to the access section where you have to specify which members will be able to see your protected content. Again you will be able to see two fields with the dropdown menu. In the first field, select membership, and in the next field, you have to select the membership level i.e., gold in this case. You can also set an expiration date or the drift function to your protected content in case you want. To do so, You have to Scroll down to the Drip/Expiration Section and check the box labeled as enable drip. Here you can also specify the time period when you want your content to be available for your users. Also, you can specify what actions the users have to perform to access the protected content, for example, purchasing the gold membership.


How to redirect unauthorized users to specific pages?
After applying the membership content protection rules, you have to decide, What do you want to show to your users who do not have access to your protected content. You can either show a customized message to your users or you can even redirect them to a specific page.
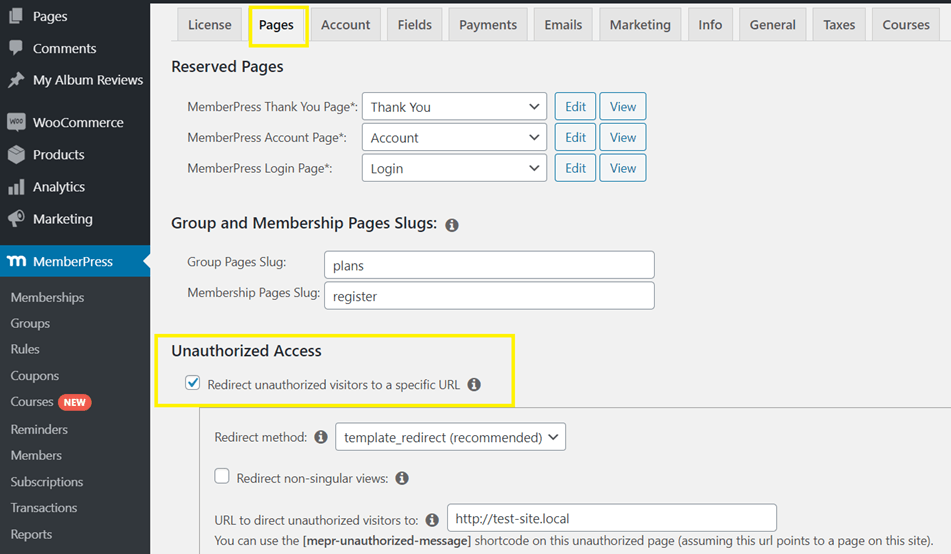
To do so, go to your WordPress dashboard I navigate to MemberPress. Thereafter click on settings and go to the pages tab. Then scroll down to the Unauthorized Access section and enable the checkbox labeled as “Redirect unauthorized visitors to a specific URL “. Now, enter the URL of the page on which you want to redirect your users and you’re all set to go.

Conclusion
If you are having a membership site, setting content protection rules can be beneficial for your business. It helps you secure memberships and thus, boost revenue and profit. In this blog, we have explained the steps to set up content protection rules on your website using MemberPress.
In case you have any further queries or doubts, feel free to leave them in the comments section below.


