Steps To Create Stunning Popup Coupon Promotions To Boost Sale
Popup Coupon Promotions are a great way to boost your website sales and grow an email list. Using discount coupon popup you can offer the right discount to potential customers. By using this promotion your customers can feel they are only selected customers to get a discount.
Our email mailbox is flooded with coupons and offers and no one care about automated content. You glance at these stacks of papers before tossing them all in the recycle bin. But have you ever wondered “Why companies send so many promotional emails?”
The companies send these emails to increase their brand awareness and showcase their products and services in front of potential customers. However, the sad reality is that most company owners are losing money because they aren’t selling the right deals to the right customers. Promotional emails are not just about converting leads but keeping your customers engaged and foster your relationship with them.
Do not worry, we have you covered. In this blog, we will show you how to create popup coupons promotions for your website’s tourists to Boost Sales on your eCommerce website.
Table of Content
1. Which Popup Coupon Tool To Use?
2. Steps To Create Popup Coupons In OptinMonster
3. Choose Display Rules To Welcome Or Saying Goodbye To Your Visitors
4. Create Coupon Codes With WooCommerce And Shopify
5. Conclusion
1. Which Popup Coupon Tool To Use?
There are a lot of tools available for making coupon popups but all of them are not effective. However, OptinMonster helps you create coupons in the right way, targeting the right audience at the correct moment and boosting website sales. A well-crafted coupon can make your visitors feel special.
With OptinMonster advanced targeting features, you can create email Optin on specific pages, in specific locations, and show them to specific visitors at specific times. For example, you can show your popup to the visitors of a specific location using geotargeting. Hence, you can consider it as the pinnacle of marketing. Using OptinMonster, you can also target coupons by the device. Combined with exit-intent technology, Combined with exit-intent technology, it can help you reduce your cart abandonment rate. OptinMonster exit-intent technology tracks your visitor’s behavior on your site and enables you to show them a popup with a targeted marketing message before they leave your site. OptinMonster is compatible with any site such as WooCommerce, BigCommerce, Shopify irrespective of what content management system (CMS) you’re using.
2. Steps To Create Popup Coupons In OptinMonster
In this post, we will list the steps you’ll need to follow to create popup coupons using OptinMonster. The first thing you have to do is to sign up for OptinMonster. After signing up, follow the below-mentioned steps:
2.1. Creating A Campaign
The very first step is to create a campaign for your own. To begin with, log in to your OptinMonster account and click on the Create Campaign button.

Now, select a campaign type from the “Create a New Drag & Drop Campaign” section.

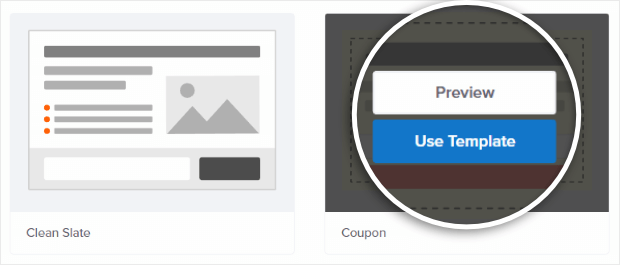
Now, you can choose a template for your popup from the 30 professionally designed templates with different layouts and color schemes.
For example, if you want to use a Coupon theme, type Coupon in the search bar. You can customize the themes according to your choice. OptinMonster’s Canvas Technology, helps you create your own form in HTML.
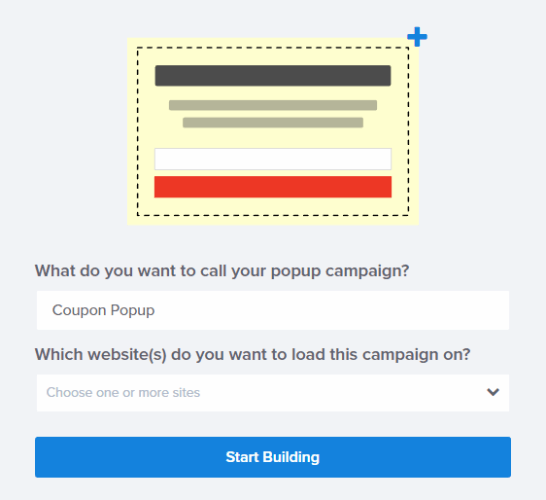
Now you have to choose a name for your popup and the website on which you want to show the popup. Then, click on the Start Building button.
2.2. Customize Your Coupon
After clicking on the Start Building button, you will be redirected to OptinMonster’s amazing drag and drop campaign builder. Here, you will be provided with the editing tools to customize your coupon according to your choice. After customizing your coupon, click on the Save button on the top right corner of your screen.
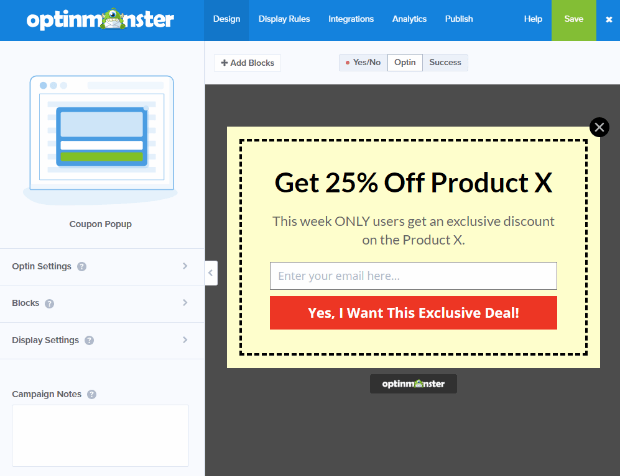
For example, if you want to change your Headline text, click on the headline and type the required text in the text box, and format the text with available editing tools. You can also edit your body text according to your needs by following the same steps.
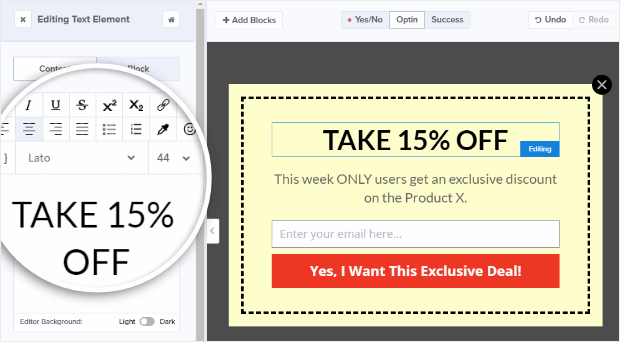
If you want to add an image to your popup, you can do that by clicking on Add Block button. Here, you can drag and drop the image of your choice. Images are often crucial in attracting your customers, so make sure that you choose your image wisely.
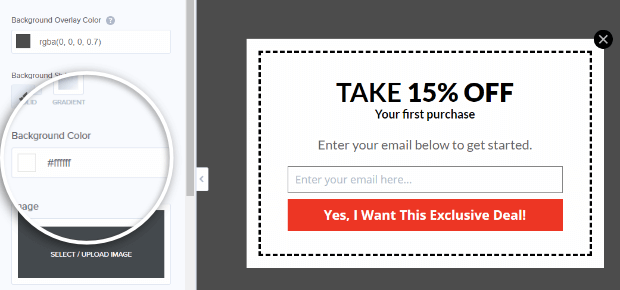
You can also change the background color of your popup. To do this, first, click on the home icon and then click on the Design tab. Thereafter, go to Optin settings and click on Optin View styles. Here, you will get access to the editing tools easily which can help you do plenty of things such as adding an image, border, or overlay.

Once you’ll click on the submit button, the Editing Fields Element menu will be brought to the left. Here, you will have an option to edit the optin fields and button formatting and actions.
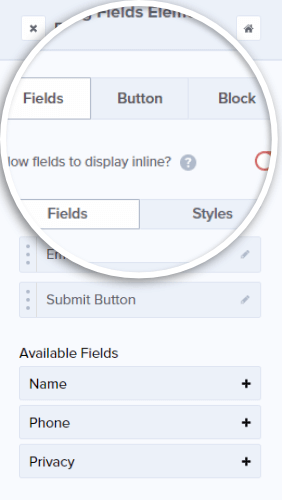
Writing a good call to action is very crucial as this is the one thing you want visitors to do to take the next step. To change your button text, click on the Button tab and type your text in the Button Text field.
2.3. Setting Up Delivery Of Coupon Code
After customizing the design of your popup coupon promotions, you’ll have to think about how to deliver these coupons to your customers after they hit the subscribe button.
You can deliver it to your customers either via Success view or via email. Enable email service provider integration if you want it to happen automatically.
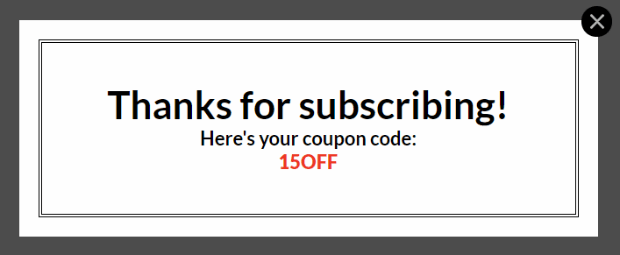
If you are using success view;
- Type the coupon code on Success view and edit it in the same way you have customized all the other elements of your campaign.
- Another way, you can redirect your customers to a new page where they can redeem their coupons.
The success view is already the default button action and your visitors will see whatever message you have designed in your Success view.
If you want to redirect your visitors to a different page, you’ll need to change the button action. Click on the Action tab and select Form Success Action from the dropdown.
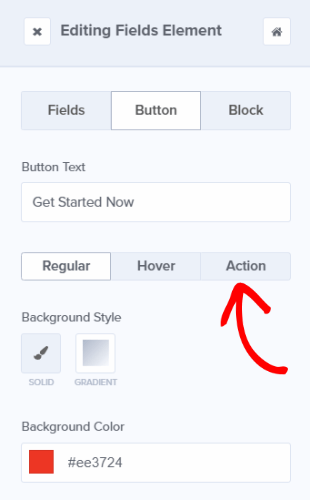
Here, you’ll find plenty of actions. Select Redirect To URL option and then enter your URL in the Redirect URL field. This is how you can send your customers to the checkout page where they can redeem their coupon.
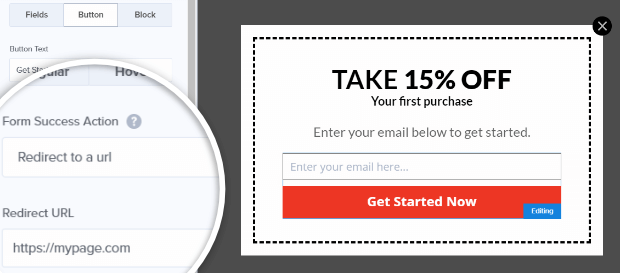
If you use your coupon link in the Redirect URL section, your coupon will be applied automatically when customers arrive at the site.
Once done, save your changes.
2.4. Publishing Your Popup Coupons
The last and final step is to publish your discount popup coupon. To do so, click on the publish tab and toggle the status button to make it live.

To get your coupon on your WordPress dashboard, install the WordPress plugin. Now, login to your WordPress dashboard, go to OptinMonster, and click on refresh options. You can now check the name of your coupon and see if it’s live. Use the sitewide embed code by clicking on the button. Note that you can use the campaign-specific embed code for your popup coupon only.
3. Choose Display Rules To Welcome Or Saying Goodbye To Your Visitors
The coupons with default display settings work well for most businesses. If you want to put in extra effort, to give your visitors a happy experience on your site, you can rather greet new visitors with a welcome message or try to retain those who are leaving.
Now, you might want to set when and where to offer these coupons to your visitors. Go to your campaign’s dashboard and click on the Display Rules tab to check the various options for displaying your popup coupon promotions to your visitors.

3.1 Welcome Your Guests With Popup Coupons
Popup Coupon campaign’s default rule is the After X Seconds rule. This rule ensures that your visitors see the coupon after they have spent quite some time on your site. However, you can simply change your settings, if you want to deliver the campaign immediately to your site visitor.
Go to the first field and set the condition “time on page”. In the next field, select the “is immediate” option from the dropdown menu.
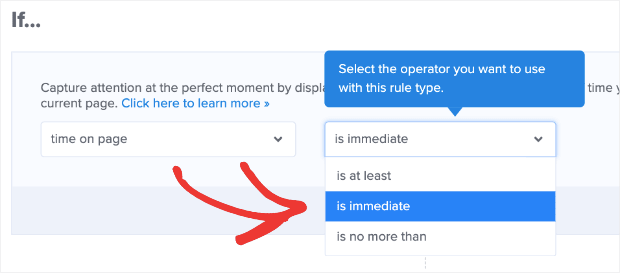
The next thing you need to ensure is that your welcome message is shown only to the new customers with the coupon. To do this, scroll down and select “visitor is new” from the dropdown menu.
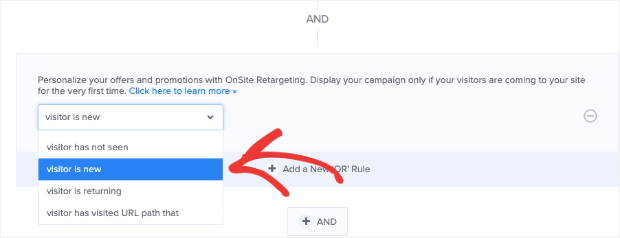
Here, you can set the condition that either “Visitors will immediately get your coupon popup as soon as they reach your site” or “only new visitors will see your coupon popup”. Now, save the changes and move along.
3.2 Retain Your Visitors Who Are Leaving Your Site
Do you want to retain your visitors who are leaving your site? If yes, you can use a popup with exit-intent technology. Exit-Intent technology tracks your visitor’s movement on your site and detects when they’re going to leave your site without making a purchase. It ensures that your visitors are delivered popup coupon promotions when they’re about to leave your site. It’s designed to capture more leads and reduce the cart abandonment rate
To do this, go to the Display Rules section and select Exit Detected from the first dropdown. You can also change the sensitivity of your exit-intent campaign ranging from low to high. It’s often noticed that the campaigns with low sensitivity are the most successful.

That’s it, you’re done.
You can also add multiple display rules for your visitors such as ;
- Deliver your popup coupon promotions when the visitors have spent quite some time on your site.
- Limit your coupons exclusively for mobile users.
- Show popup coupons on certain pages on a specific date or time.
- Use shareable Monsterlinks to share your popup coupons with your email list.
You can put in more effort and creativity to provide your site visitors with an amazing experience with the popup coupon promotions.
4. Create Coupon Codes With WooCommerce And Shopify
In this blog, we will show you how to create a coupon code with WooCommerce and Shopify. Without further ado, let’s get started.
4.1 Creating Coupon Code With WooCommerce
First, make sure that you installed and activated the WooCommerce plugin. Then sign in to your WooCommerce account from your WordPress account.
Thereafter, inside your WordPress dashboard, go to WooCommerce and click on Extensions.
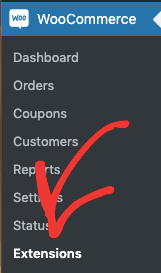
Now, type URL Coupons in the search bar. To create your coupon URL, purchase this extension.

After purchasing the extension, go to WooCommerce in your WordPress dashboard and click on Coupons.
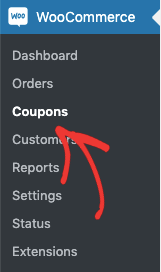
Then, click on the Add New Coupon button.

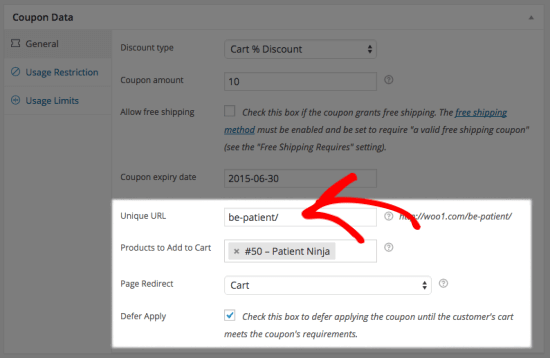
Navigate to the coupon data section. Now, go to the General tab and create your custom coupon URL in the Unique URL section.
The next step is to put the URL in your popup coupon. To do this, go to your OptinMonster’s campaign dashboard and go to the Actions section. Now, enter your Coupon URL in the Redirect URL field.
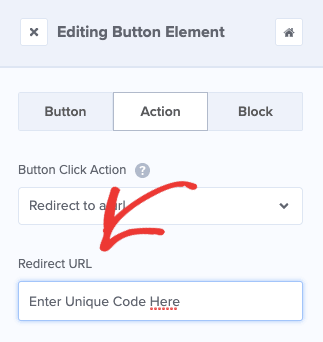
That’s all. Now, every time a visitor clicks on the call to action button, they will be redirected to the checkout page with a coupon code already applied.
4.2 Creating Coupon Code With Shopify
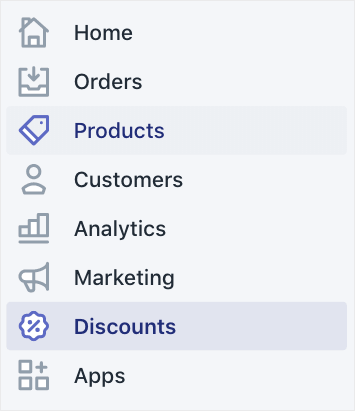
To create a coupon code URL with Shopify, go to your Shopify store dashboard. From the left-side menu, click on discounts.
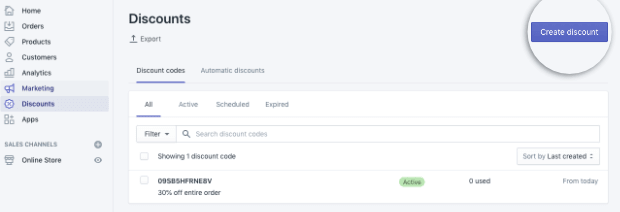
Then, click on the Create Discount button.
Now, you’ll have to choose between a discount code or an automatic discount.
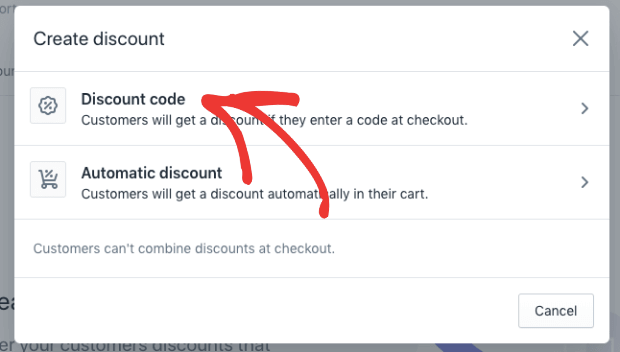
For instance, you want to create a discount code. Click on the discount code option from the prompt and customize the settings to match your needs.
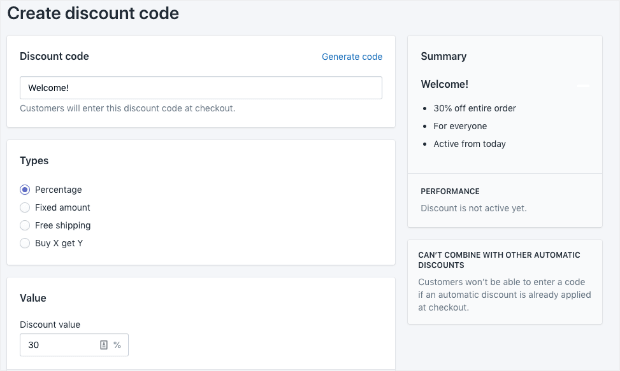
Once done, click on the Save Discount code button.

Now scroll up and find your confirmation message. You will also see an option to “Get shareable link” in the confirmation message.

Click on the “Get shareable link” button and copy your coupon code URL by clicking on the Copy Link button.
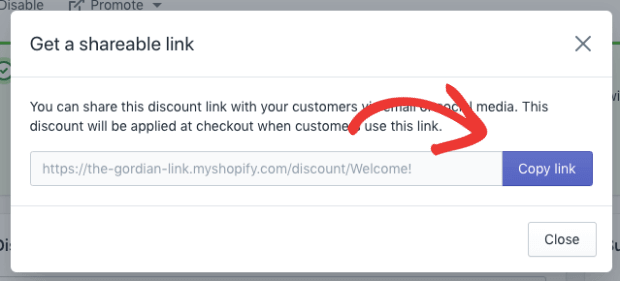
Now, head back to your campaign’s dashboard in OptinMonster and enter the URL in the Redirect URL field.
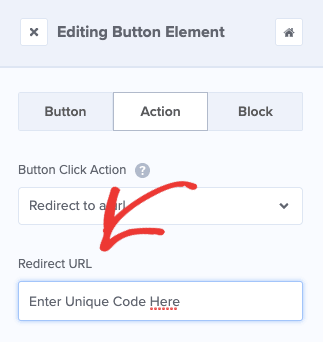
That’s it. Your customers will be redirected to the checkout page with an automatically applied coupon when they click on the Call to Action button.
Conclusion
That’s it for this tutorial. We hope that you got the idea of you can boost your eCommerce website sale using Optinmonster Popup optin. It will also help you to grow your email list.
If you have any queries or feedback, do leave them in the comments section below. We would love to help you.

