How to Easily Create a WordPress Order Form
Planning to collect payment from your clients while filling your website form, you can collect payment along with details by using WordPress Order Form. Using WPForms you can easily create an order form with the help of WPForms stripe and PayPal payment addons.
You can create an order form with or without a payment option but in our tutorial, we will learn the WordPress Order Form with payment options integration. Order forms are mostly used by freelancers, fundraisers, or by small businesses. You can also use it for selling digital goods or services. WPForms allows you to accept credit cards and a Paypal payment gateway.
WPForms equips you to create an Order form for your website along with a payment gateway. The use of WPForms allows the acceptance of payment via two payment providers i.e. PayPal and Stripe. Whether it is a small business or be it fundraising, order forms are helpful.
Note – Integration of your WPForms with the payment providers PayPal and Stripe are available with the WPForms Premium license. For this work, you need to buy Pro Plan which will cost you only $199.50/ year for 5 sites.
You may also be interested in Email Marketing Services, A/B Testing plugins, and Lead Generation Plugins
Steps to Easily Create a WordPress Order Form with online payments are as follows
Steps: Creation of a simple order form in WordPress
- The first thing you need to do is buy and download the WPForm plugin from your WPForm dashboard
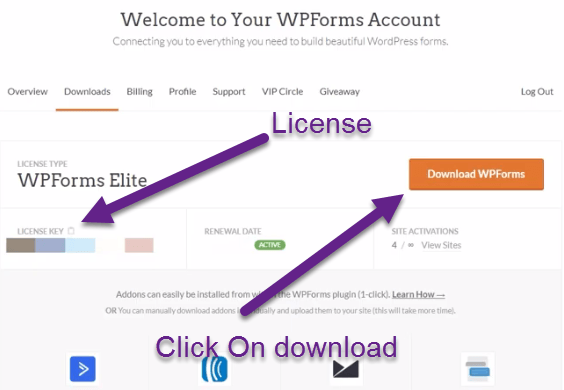
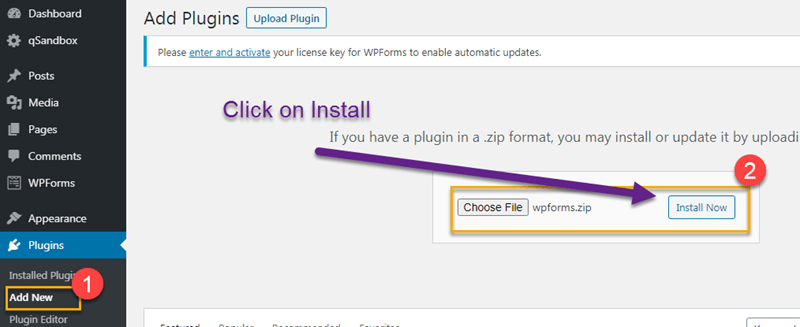
- Now Log in to your WordPress account and then you need to install and activate WPForms
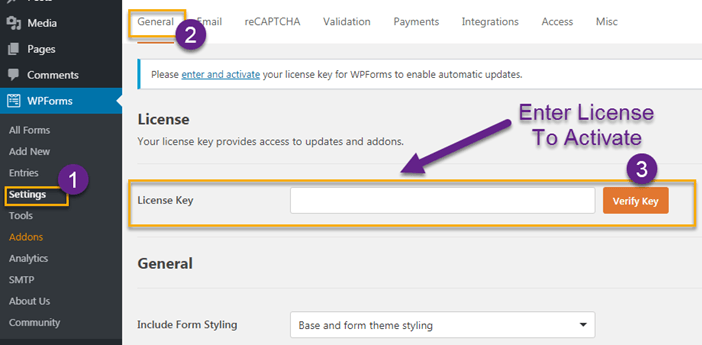
- You will be required to verify the plugin by entering the license key which is given on the download page of WPForm. For license, verification click on the WPfoms settings tab verifies the license key.
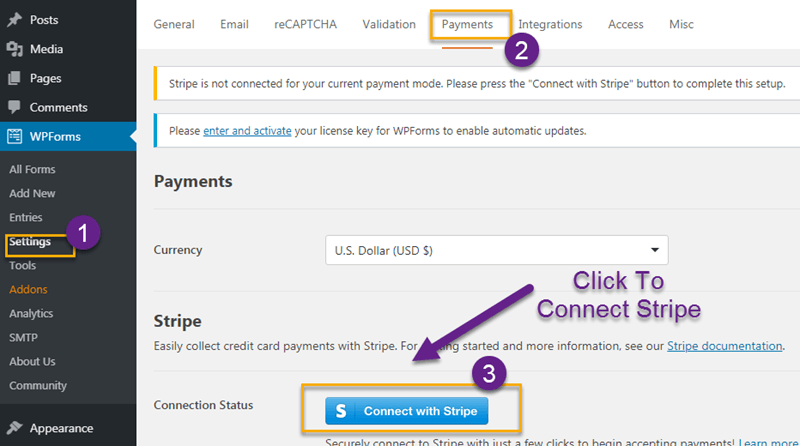
- Inside the WPForms setting tab, you need to connect to the stripe account. So click on the payment tab and underpayment tab click on the connect to Stripe button. On the striped page, you have to fill in all the necessary details to connect payment.
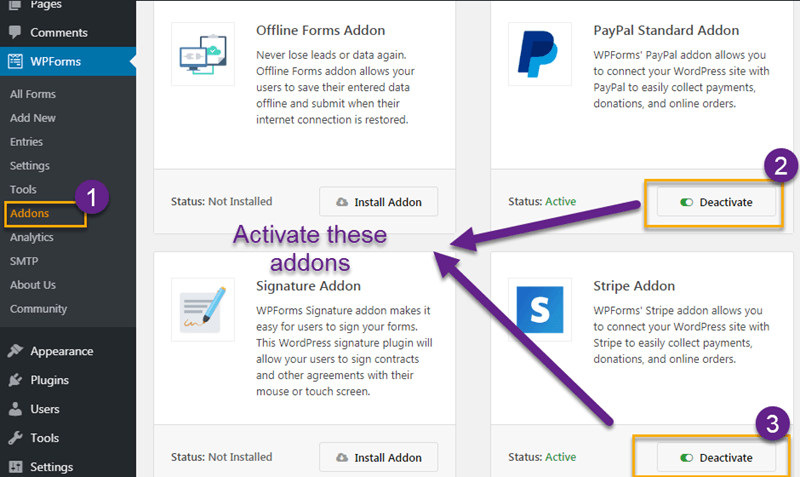
- Once your license is verified you can move forward to activate the PayPal, Stripe, and the form Template pack add-ons. The form Template pack provides dozens of pre-existing Templates which you can customize as per your need.
- Then, visit the WPForms tab and click on add new To create a new Contact form
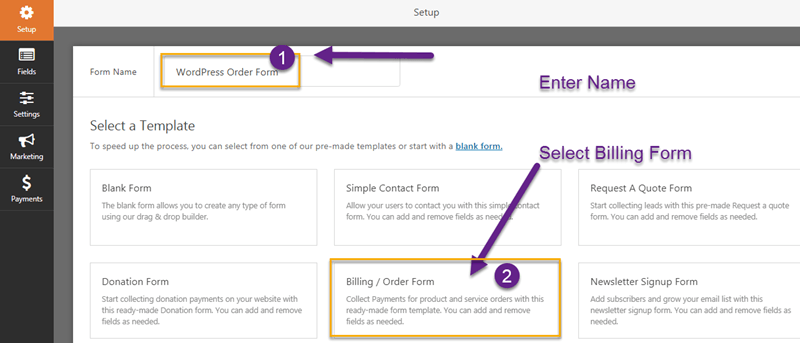
- And there you need to enter the name of your form and below that box, you will find several templates to choose from, like, request a quote form, donation form, billing/order form, blank form, simple contact form, and newsletter sign-up form. For now, we will select the billing/order form template.
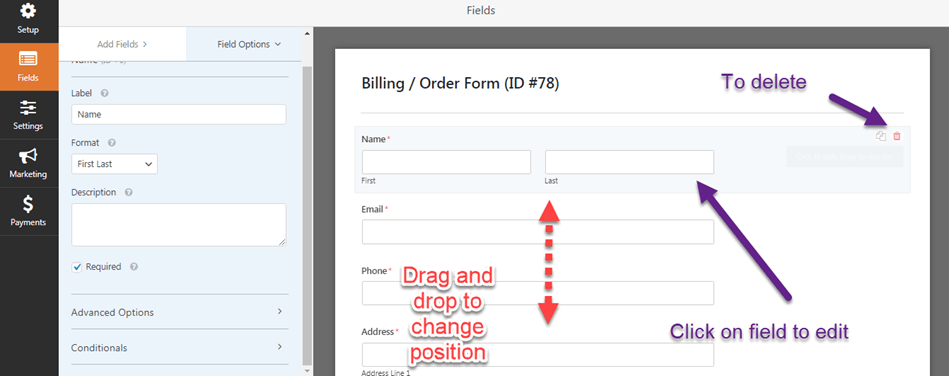
- You will get redirected to the Premade billing form. You can click to edit on any single field and also add and delete fields by just clicking on them. If you want you to add extra more fields like phone number email id country etc.
- Now we need to if you want your payment to be done via Stripe you will have to add a ‘Stripe credit card’ field in the Template. So drag and drop the credit card field underpayment tab.
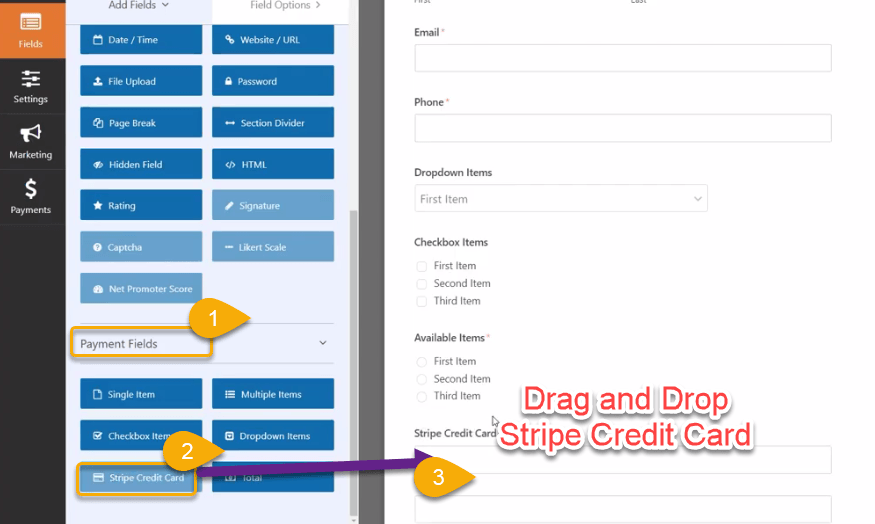
- And also add a ‘Total’ field which will display the total amount based on the selections made by the user.
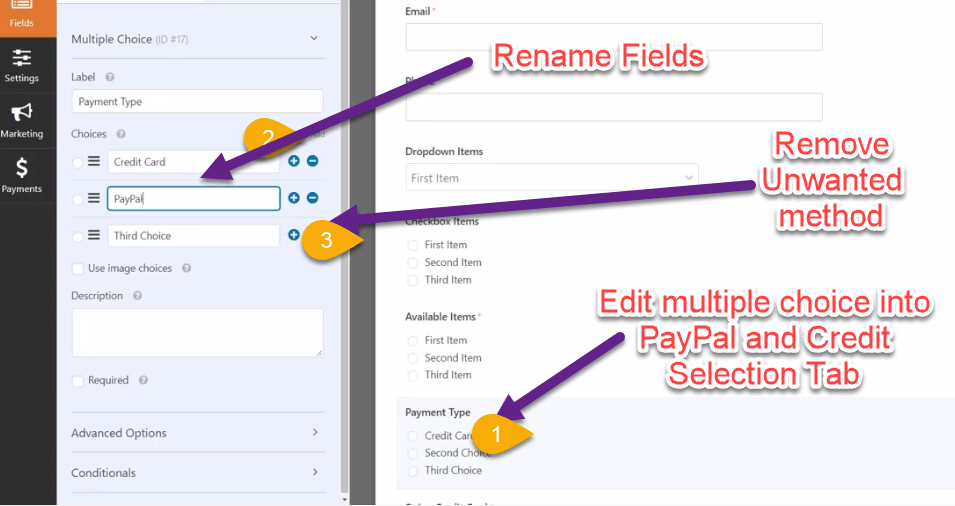
- Now drag and drop down a Multiple Choice so that we can allow our customers to choose payment between a credit card and PayPal. Click on the fields to change their names like PayPal and credit cards.
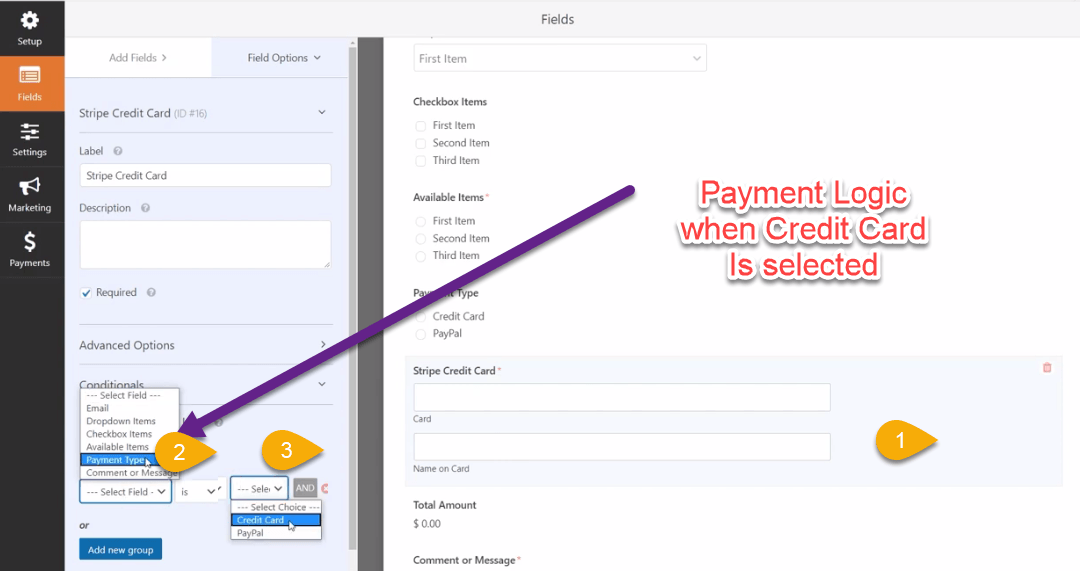
- Not we will add conditional logic on payment method so that if the selected payment is credit card then “Stripe credit card” should be visible. Click on “Stripe credit card” and then click on conditional logic. Inside that add a logic if selected “Payment method” is credit card then only “Stripe credit card” card should show.
Logic Example -> Show >>>>> Payment Method >>>> Is >>>> Credit Card .
Now we need to move over to the Payment setting tab. We need to enable the First move under the General setting Tab and Payment setting tab.
General setting Tab
- Under the general setting, we need to fill in the general details of forms. Then we have to click on the Notifications tab under that change “Send To Email Address ” To your email address or wherever you want to get notified. And click on save.
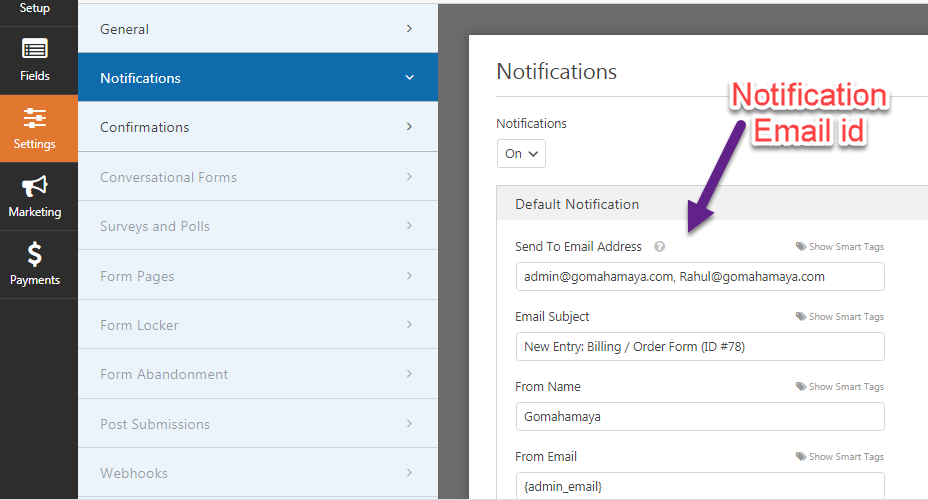
Payment Setting
- PayPal Setting Tab – Enable it and then fill the PayPal email id. And there also we need to add logic that if the payment method selected is Paypal then Proceed with Paypal
Logic Example -> Process >>>>> Payment Method >>>> Is >>>> PayPal .
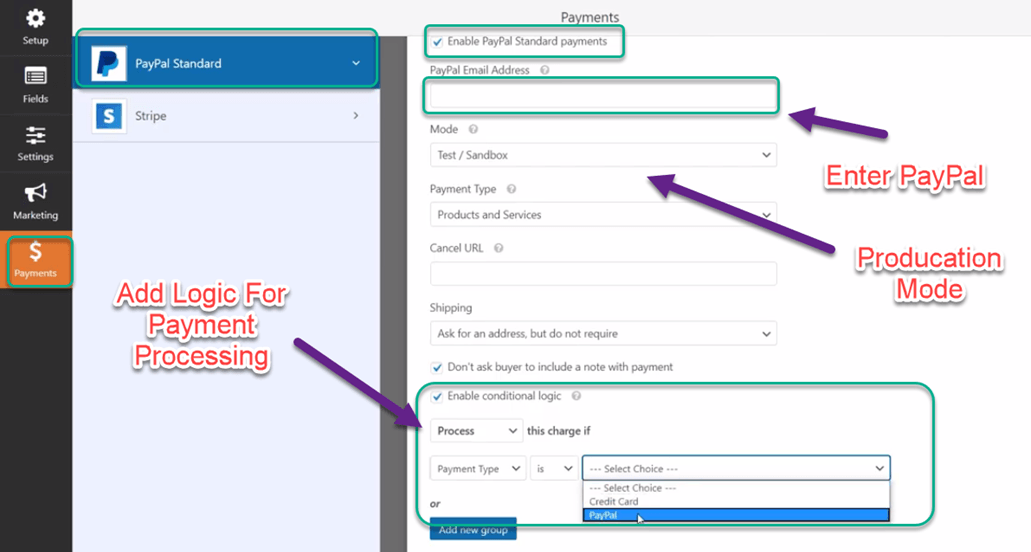
- Stripe Setting Tab – Enable Stripe and then fill the Stripe email id. And there also we need to add logic that if the payment method selected is Paypal then Proceed with a Credit card
Logic Example -> Process >>>>> Payment Method >>>> Is >>>> Credit Card .
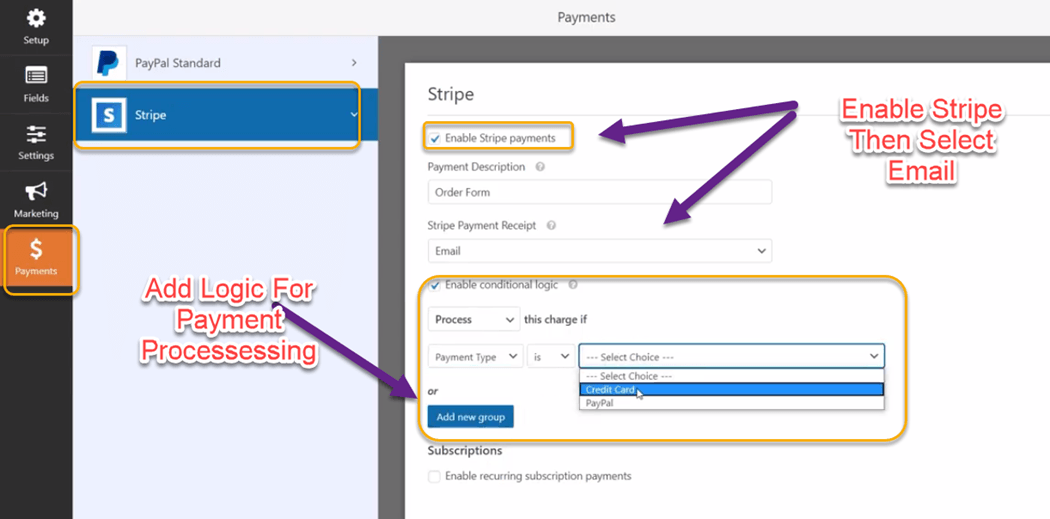
- Once you are done with the customization of the template, save the changes and you are ready to lodge in your new order form.
Embed the Form
- Now Move back to the dashboard and click on Pages to add New.
- You will get an option to add a title. Exactly underneath there is a + sign which will lead you to a dialogue box. Search or scroll to find WPForms.
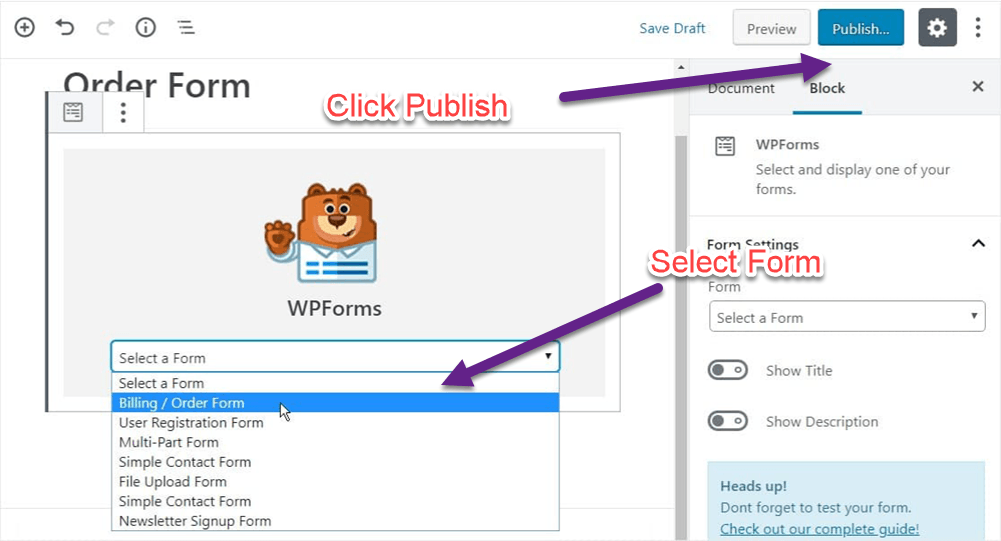
- Click on the order form then save and you are ready to publish.
Conclusion – Online Order Form is used by most freelancers globally. WPForms made our work easy so in our thought it’s worth buying.

