How To Easily Create Membership Site With WordPress
Planning to create a Membership Site With WordPress. Membership allows users to charge money from visitors for restricted content. You can Restrict content such as videos, Photos blogs Courses, etc.
Now we will learn how we can easily create membership sites in 5 Simple Steps
You may also be interested in Multi-Vendor Plugin, Page Builder Plugin, Fomo Plugins
What is a Membership Site?
Membership sites are gated websites that allow only subscribers to access their exclusive content and special offers. It is a “Members only section” on your website.
It could be free, paid, or operate on a tiered basis. This could be a great way to monetize your website and generate recurring revenue. It lets you build a wonderful community of users and a profitable business.
- Why should start a WordPress membership site?
- What is MemberPress?
- Steps to Create a WordPress membership site–
Setting up a membership plugin
Providing members-only content
Why should start a WordPress membership site?
We are listing down some perks of having a subscription site so that you can decide if you want to go for it –
- Monetize your digital business – Membership sites allow you to generate “recurring revenue” from your website. Members pay monthly or yearly fee for your exclusive content and your revenue grows every time you get new signups.
- Build the relationship and foster customer loyalty – It allows you to set up and manage a community of your members where you can directly interact with them and get to know more about their desires and needs. This eventually helps you to build a strong customer base for your business.
- Establish your industry authority – Running a membership website conveys to your visitor that you are a specialist in your “niche”. It implies that you must be producing content, be it products, online classes, guides that add value to your members.
- Have a pre-qualified audience for marketing – When you are running a membership site, your members are basically your pre-qualified audience who value your content. Your members already have a higher rate of interest in your products, so they serve as a perfect candidate for marketing your new products or services.
- Exponential growth – Membership sites are simpler to maintain and enable you to grow your business exponentially. You can always acquire new members or launch new products on an existing membership website.
What is MemberPress?
MemberPress is one of the best WordPress membership plugins which allows you to charge your users for accessing your content. MemberPress has some really amazing features such as easy setup, relevant reporting, a pretty pricing page, coupons, simple payment gateway integration, and the list goes on. Using the MemberPress plugin you can easily sell courses online, sell digital products, accept credit cards securely and restrict content on your website.
Steps to Create a WordPress membership site
You can easily create a membership site with WordPress by following these simple steps
memberpress is Premium WordPress Membership Plugin which you need to buy first
Note – There is no free version of memberpress Plugin
-
Setting up a membership plugin –
First, you have to install and activate a membership plugin.
Open your WordPress dashboard, go to plugins and click on add new. And then select the upload button. Then upload the MemberPress plugin and once installed click on the activate button.
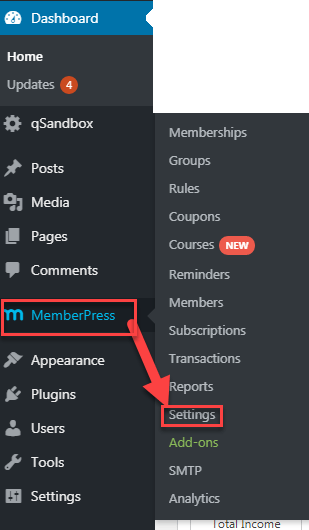
Now go to MemberPress, click on the option and configure the settings to your requirements.
-
Setting up a payment method
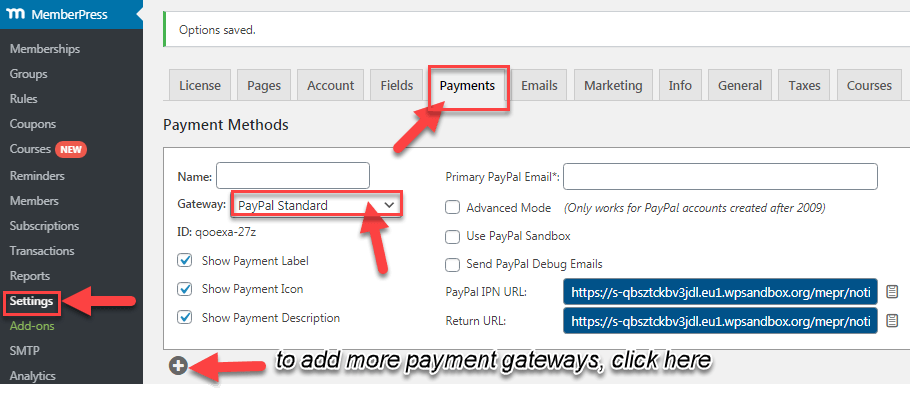
In the options section, you will see the payment tab on the top of your screen.
Click on the payment tab to set the payment gateways on your membership website. PayPal, Authorize.net, and stripe are the payment gateways available on MemberPress.
To add the multiple payment gateways, click on the add (+) button on the down-left corner of your screen.
You can select one or multiple gateways.
-
Creating membership levels
Now that you are done with your MemberPress settings, the next step is to configure membership levels for the visitors to purchase.
You will have many levels to choose from such as bronze, silver, and gold membership models. With MemberPress, you can make multiple membership levels.
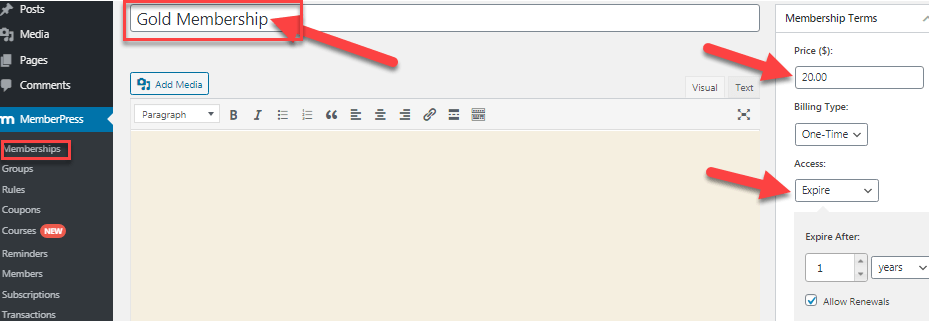
To create a membership level for your site, go to the MemberPress section and click on the membership tab. Now you have to click on the “Add new” button to add it to your website.
At this point, you can give it a title, set the price and billing type from the “membership term section”. You can now decide the access time i.e. whether the members have to pay one-time or have to renew after the expiration date.
Once you will scroll down, you will find a membership options section. Here you can customize a welcome e-mail for your members and configure the permission and price box as well.
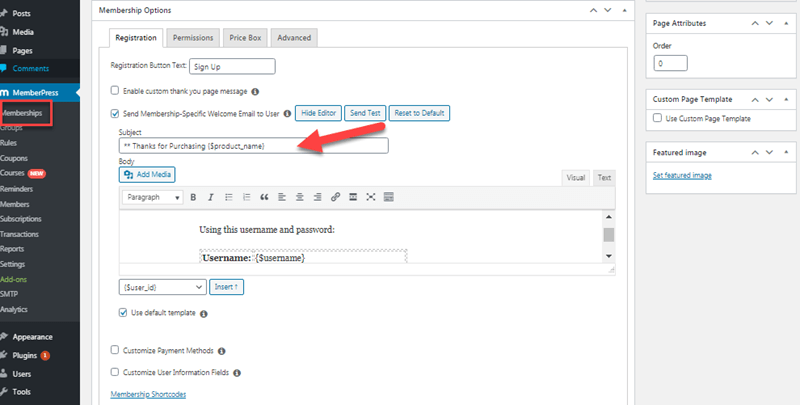
Once you are done with the configuration, you can happily publish your membership.
- Add access rules- You can restrict your website’s premium content by using rules and access conditions.
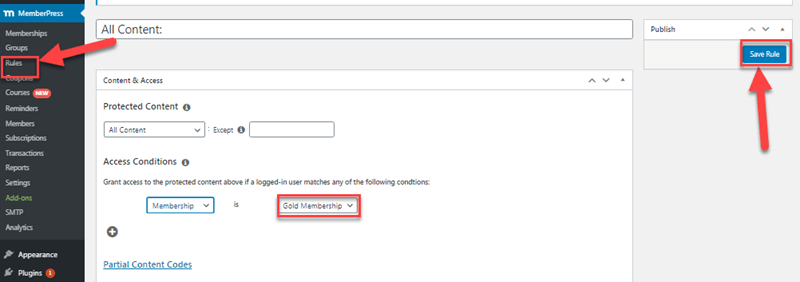
To do so, go to MemberPress click on the rule tab, and select add new button. Now on the screen, you’ll find a range of dropdown menus. You can now create a new rule and link your content to the membership level.
Go to the access condition, click on the dropdown, and select membership. You can now assign a membership level such that people belonging to the assigned level can access your content. Make sure you save the rule.
- Providing members-only content
If you are running a membership website, it implies that you are providing content that adds value to your members. You have to create compelling premium content, be it products, online courses, or related services for which members will pay you.
Create a new post on your site for your exclusive members.
Now if you want you can set up what the non-subscribers will get to see when they access your premium content. To do this, Go down to the WordPress guide and click on MemberPress unauthorized section and make the settings as per your liking. Now you are all set to publish your “members-only content”.
If you want to check that your content is restricted to certain membership levels, go to the “post” sections on your dashboard and click on “all posts”
-
Setting up your pricing page
Once you are done with all the aforesaid configurations, the final step is to set up a pricing page where the visitors can see your membership plans and choose the one that’s right for them.
To create a pricing page who need to follow these simple steps –
Go to the MemberPress section, select groups, and click on add new button. Here you can add a descriptive name for your pricing page.
Scroll down to the “group options section”, click on add (+) button, and add the membership plans. You can also change the theme of your pricing page.
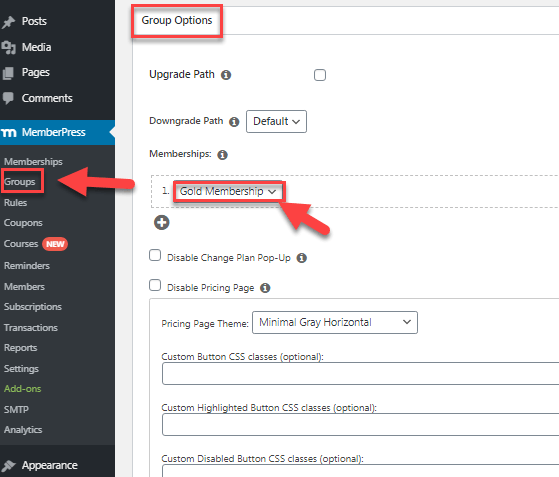
Once you’re ready, go ahead and publish your page.
-
Pricing
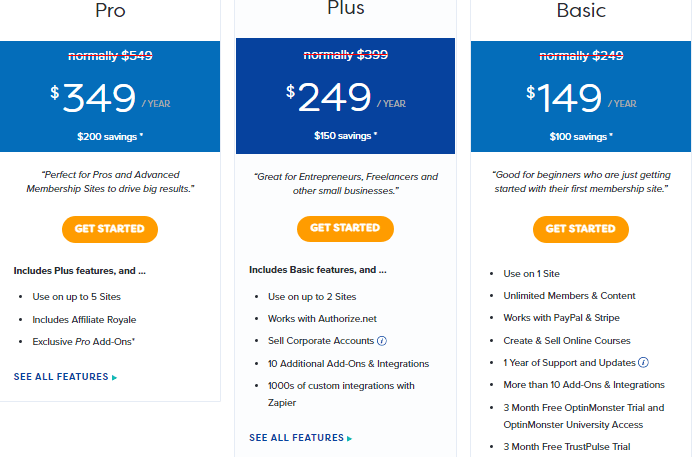
$349 / YEAR for 5 sites along with Pro add-ons, $249 / YEAR for 2 sites
If you want MemberPress to redirect the non-members on your pricing page whenever they try to access your premium content, go back to the MemberPress section, click on groups and copy the URL of the group. Now you have to go back to options, scroll down to the “unauthorized access” section and paste the URL on the box next to “redirect unauthorized visitors to a specific URL”.
Make sure to click on the “update” button at the bottom of your screen to update your settings.
Conclusion
A membership website is a popular way of earning recurring revenue on your website. You can now convert your website into a membership site by following the simple steps mentioned above with MemberPress
![]()


good