How To Create Secure Authorize.net Payment Form
Authorize.net easily be set up with Forms to Accept Payment From Anywhere On any Device. Authorize.net payment form allows us to accept payment through credit cards, Visa, Click to Pay, digital eChecks, and PayPal. Payment Forms not only contain client Information but also allow us the option to pay. So now we will learn to create Payment Forms For Authorize.net which can be used to accept donations, payments collection, online orders, and recurring payments.
Want to ease the process of accepting payments on your website? If yes, we have got little something for you. WPForms has announced its integration with the Authorize.net addon. It implies that now you can easily accept payments by cards directly on your WordPress site by creating Authorize.net payment forms.
So, let’s see how it can help you and your customers.
Table of Content
WPForms and Authorize.Net Integration
Authorize.net is an advanced payment gateway provider that helps you accept credit card and electronic payments anytime, ant device, and anywhere. Also, it is trusted by over 4 lakh users. Autorize.net is a WordPress addon that enables you to accept card payments directly on your website using WPForms. It makes the checkout process seamless and hassle-free.
Authorize.net addon has the following features:
- Advanced Fraud Detection- Authorize.Net uses Advanced Fraud Detection that identifies and prevents any fraudulent transaction that can hamper your business.
- Multiple Payment Options- It enables the users to accept payments in multiple ways including credit and debit cards, digital payments, and eChecks. Also, it accepts all the major cards payments available.
- Protect Your Data- It stores the customer’s personal data on secure servers using Customer Information Manager (CIM).
- Simple Setup- Authorize.net has an extremely simple setup.
- Recurring Payments- You can also accept one time or recurring payments for selling your products and services
- Condition Logic- You can also use= add conditional logic to your payment form and make it smarter to increase conversions.
To get started with Authorize.net, you can create a payment form in WordPress. A payment form enables you to accept online recurring subscription payments and donations easily on your WordPress site.
So, let’s check how to install and set up Authorize.net with WPForms
Setup Authorize.Net Payment With WPForms
Using Authorize.net with WPForms, you enable your users to send in one-time or recurring credit card payments directly through the form. If you want to set up Authorize.net payments in your payment forms, you can do so by adhering to the following steps.
Note: WPforms Authorize.Net addon is available only on the Elite license of WPForms.
1. Install WPForms and Authorize.Net Addon>
The very first thing that you have to do is to install the WPForms plugin on your WordPress site. Then, you have to install and activate the Wpforms Authorize.net addon.
To do that, go to WPForms and click on Addons. There you will see all the addons available for your license. You can click on the Refresh Addons button if you do not see any addons on your screen. Thereafter, search for “Authorize.net” in the search box and click on the Install Addon button. Then your addon will be installed and activated automatically. Once it’s ready to use, you will see a green-colored Active status on your addon.
2. Connect Authorize.Net To Your WordPress
After activating the Wpforms Authorize.net addon, navigate to WPForms, click on settings and then go to the Payments tab. Select the desired currency from the Currency dropdown menu.
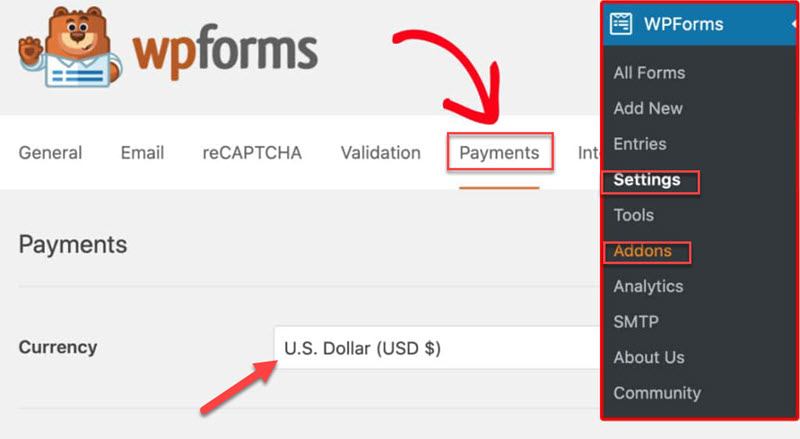
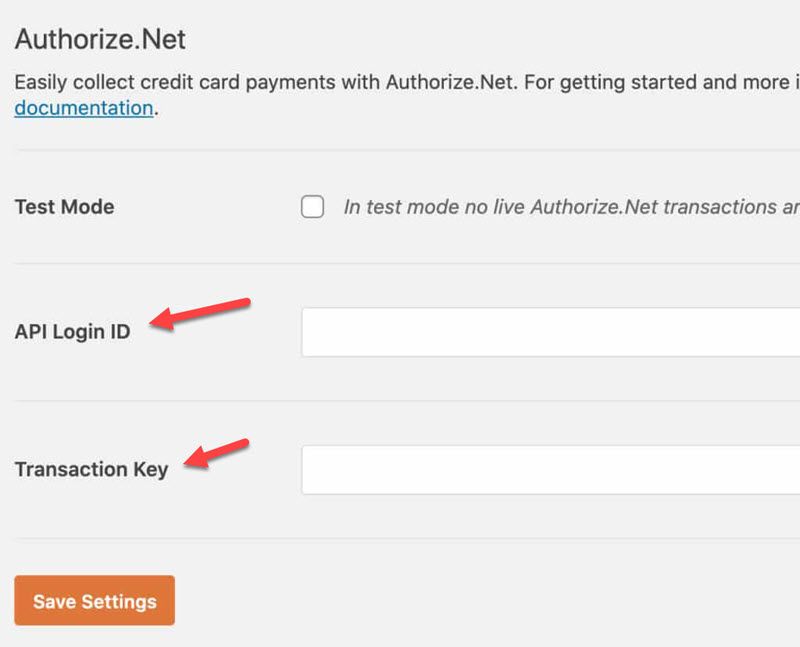
Then scroll down to the Authorize.Net section. Here, you have you enter your API Login ID and the Transaction key to connect your site to your Authorize.Net account. Let’s see how can you do that.
3. Sign In To Authorize.Net Account
The next step is to sign in to your Authorize.Net account. If you don’t have an account already, don’t worry you can create it now. To do that, open a new tab or window and sign in to your Authroize.Net account.
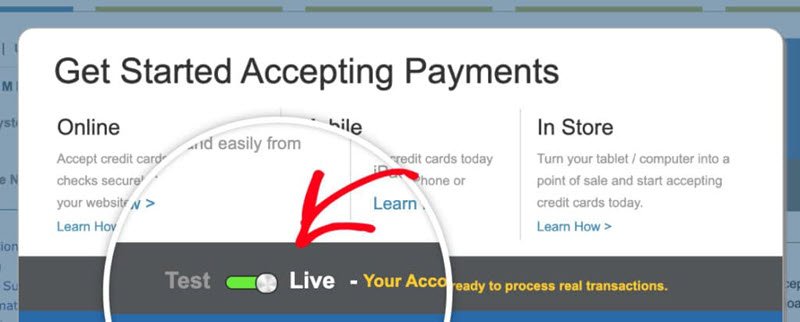
After logging in to your account, you will see an overlay on you’re screen. Here, you will see whether your account is on test mode or live mode. Make sure to toggle the key to the live mode. Thereafter, we will move on to the next step.
4. Find API Login ID and Transaction Keys
After logging in to your Authorize.Net account, you will be able to locate the desired keys. To do so, go to your Authorize.Net Account on the left side of your screen. Then click on Settings.
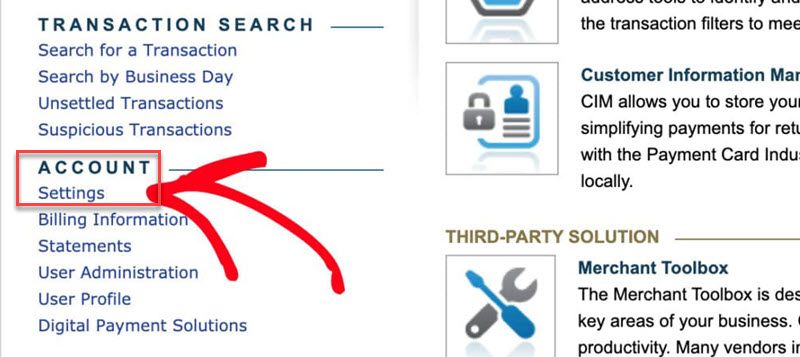
Then navigate to the Processor section in the settings page and click on API Credentials and Keys.

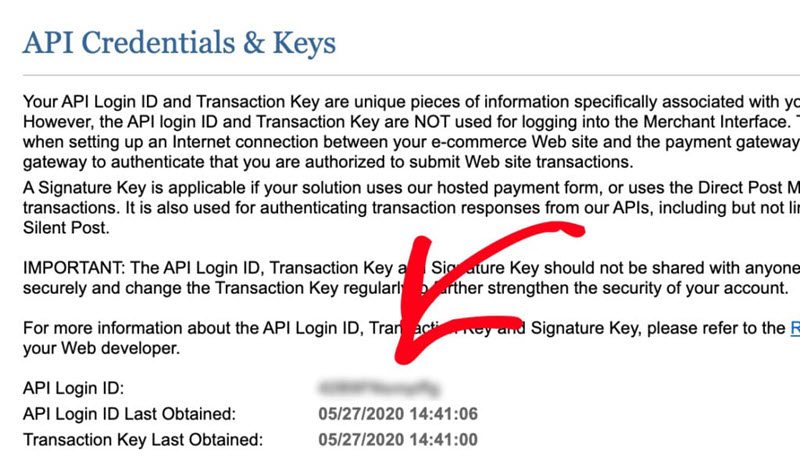
Here, you will find your API login ID. Copy the API ID.
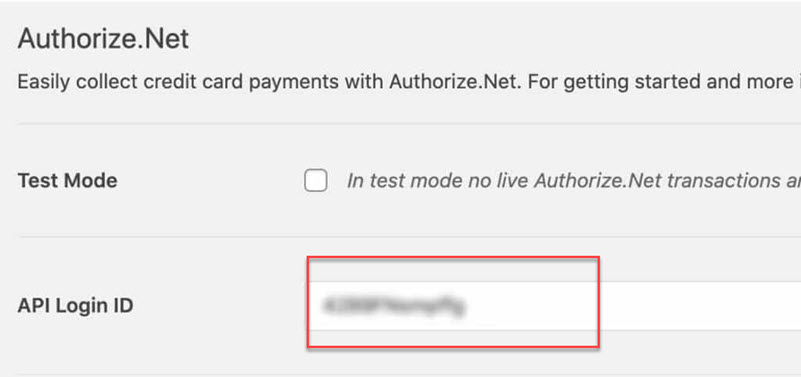
Paste your API login ID into the API Login ID Field on the WPForms settings page.
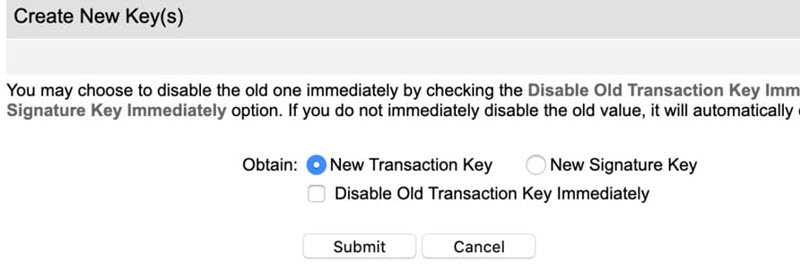
Now, you have to find the Transaction Key. To find it, go back to the API Credentials & Keys page on your Authorize.Net account Then, navigate to the section named Create New Key(s). Then go to the Obtain option, select New Transaction Key, and click on submit button.
Thereafter, you will see an overlay on your screen asking to verify your Pin. Click on the Request Pin button and your verification process will begin. Then, you will receive your Pin on your Email ID. Enter the correct Pin and then click on the Verify PIN button.
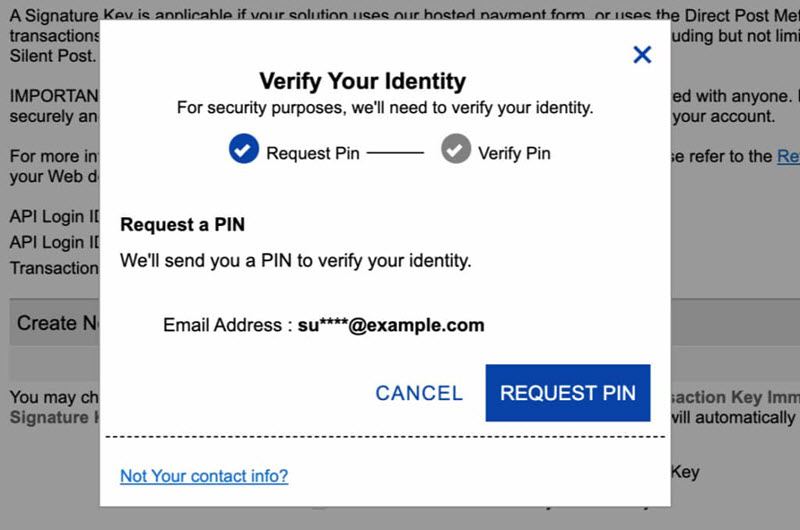
Now, you will see your Transaction Key on your Authorize.Net screen. Copy the key and go back to the WPForms settings page.

Paste the key in the “transaction Key” field and click on the “Save Settings” Button.
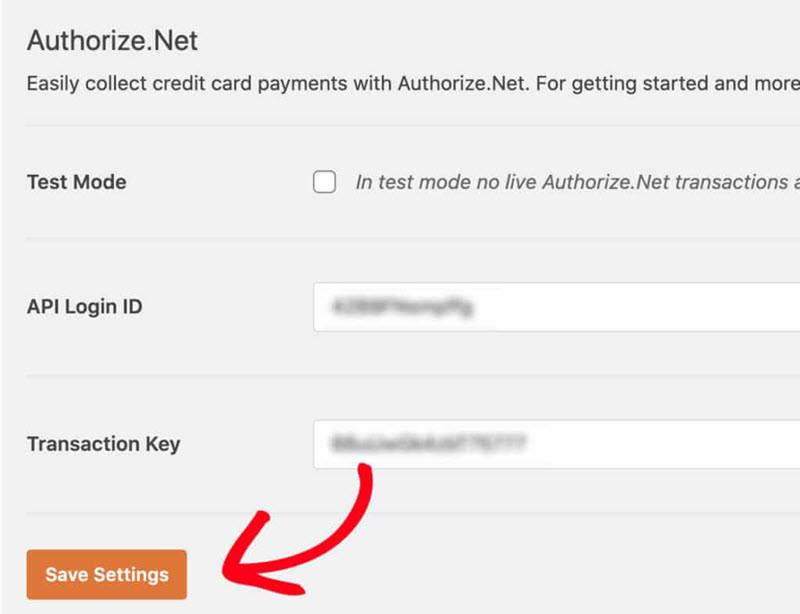
Now you will see a message saying “Settings were successfully saved” at the top of the WPForms Payments page.

5. Add Authorize.Net to Your Payment Forms
The next step is to add Authorize.Net to your payment forms. For this, you can either create a new form or edit your existing form. To create a form with Authorize.Net, you have to add the following four sections into your form:
- Authorize.Net
- Name
- Items (These can be either single items or multiple items)
After adding the following files to the form builder, go to the Payments section and select Authorize.Net. Thereafter, you’ll see a box labeled “Enable Authorize.Net payments.” on the Authorize.Net panel. Check the box and move ahead to the optional settings.
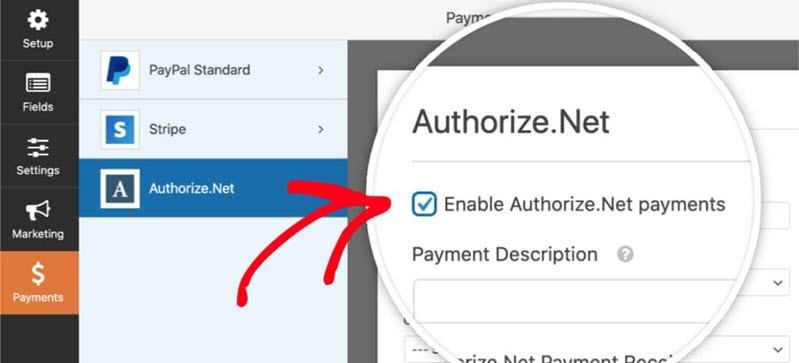
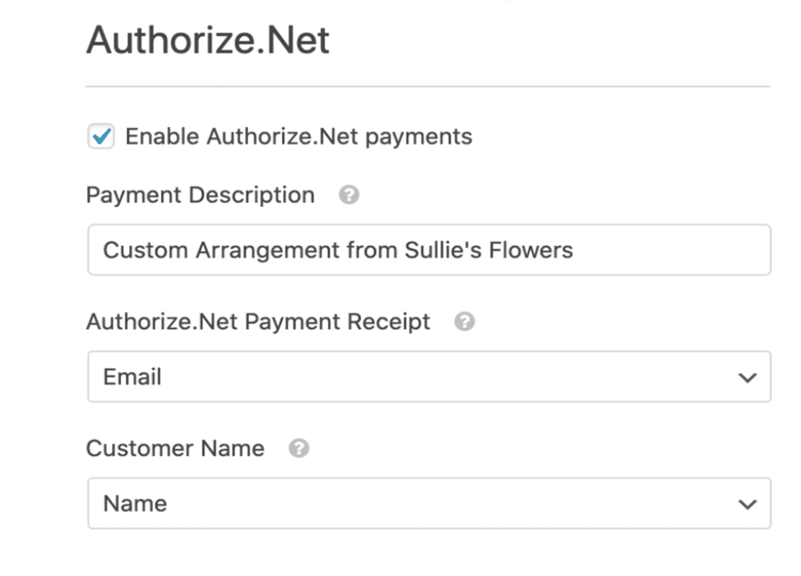
There are a few optional settings that you can add according to your needs.
- Customer Name- This section will include the name of your customer. So, if you select this field, the information will be sent to Authorize.Net.
- Payment Description- This field applies to the one-time payments and it will show the payment description to the user’s credit card statement.
- Payment Receipt- If you add this field to your form, the transaction receipt will be sent to your customer’s email address. This field also applies to one-time payments only and not to recurring subscriptions.
6. Enable Recurring Subscription Payments
Recurring Subscription Payment basically means an ongoing payment on a scheduled basis for any products or services. Here, your one payment will be processed right \away and then your next payment is scheduled periodically.
To enable Recurring Subscription Payments on your site, check the box named Enable recurring subscription payments under the Subscriptions section. Then, you will see a variety of options appear on your screen. These include:
- Plan Name: Basically, the plan name appears on the user’s credit card statement. So in this section, you can give a name to your plan.
- Recurring Period- This section determines the period where your future payments get due. This could be monthly, quarterly, or yearly as per your choice.
- Customer Email- Here you have to choose the email field with which the subscription is associated.
- Customer Name- The name field should include the first name and the last name. This will be the name with which the subscription will be associated.
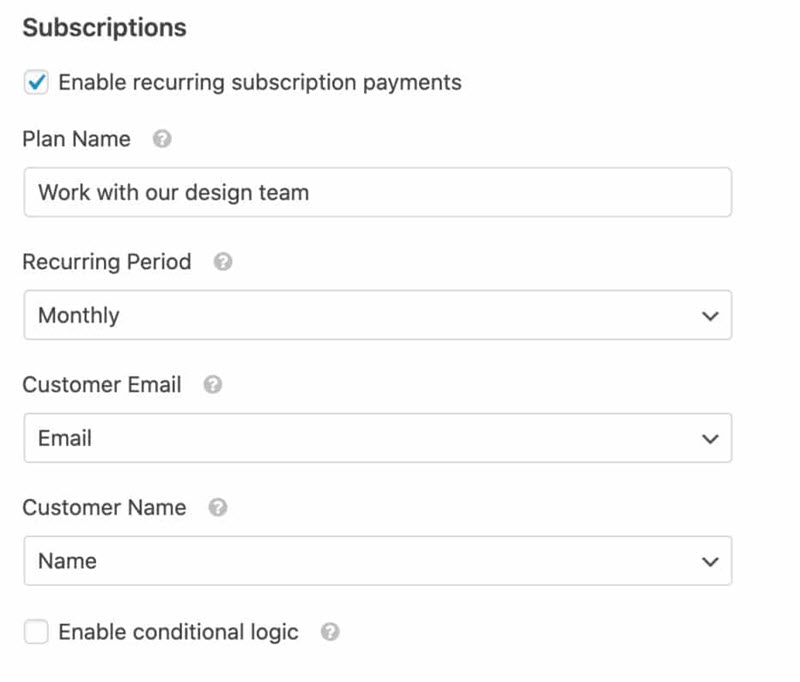
Once done, make sure that you save the changes and then move ahead.
7. Set Up Conditional Logic
This step is optional and depends entirely on you. Conditional Logic involves creating smart forms that automatically alter your form’s field according to your user’s selections.
For Payments
You can use multiple conditional logic with the Authorize.Net payments form. For example, you want your user to choose between one-time payment and recurring payment.
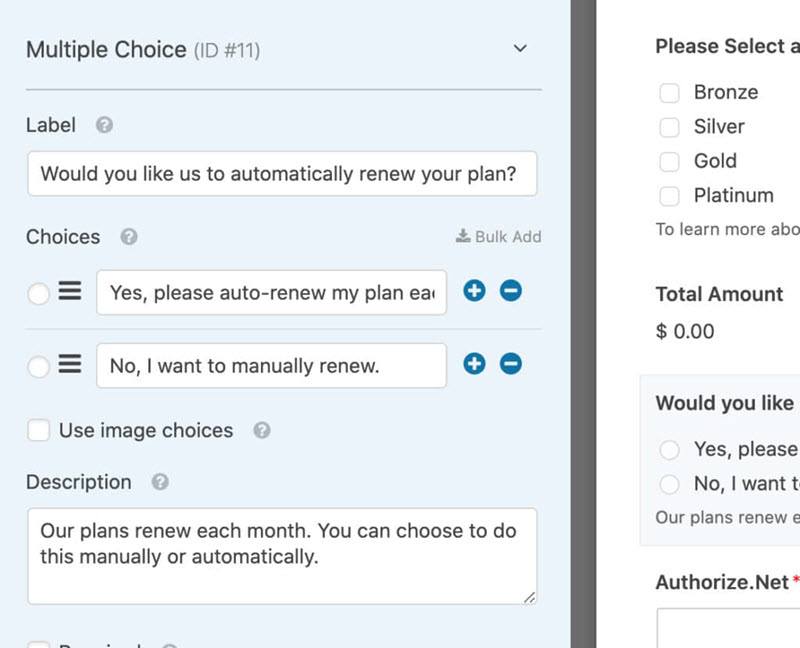
Now we have to add a field in our form where the users can choose between one-time payment and recurring payment. To do this, you can add either a Multiple Choice or a Dropdown in your form where the users can choose among the options
Now, you have to ensure that the user’s selection is applied to the payment form. For this, you need to create conditional logic.
Go ahead and navigate to the payments section and click on Authorize.Net. As you have already done the configuration, move ahead to set up the conditional logic.
Firstly, you have to set up your recurring period. Select the recurring period from the dropdown menu.
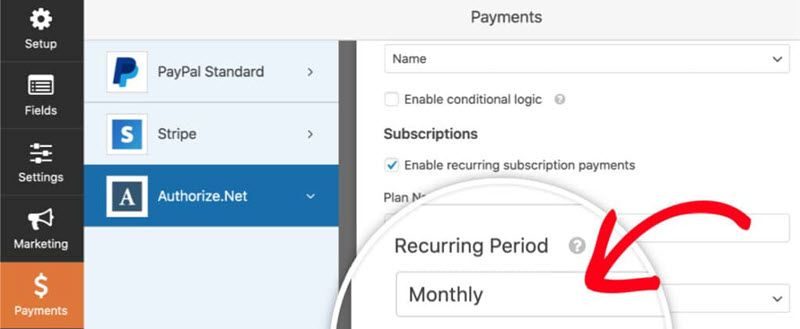
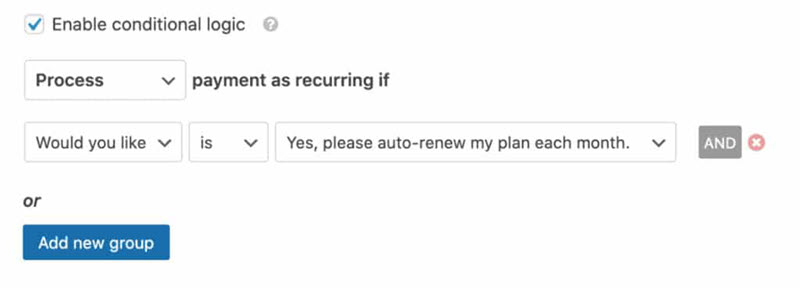
Now scroll down to the bottom and check the box named “Enable conditional logic”.
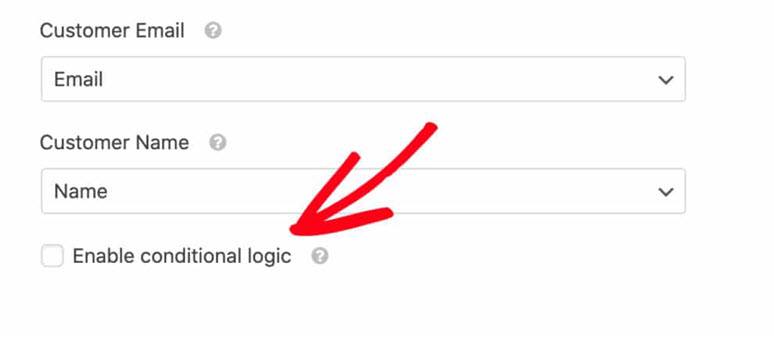
Now, you will see additional fields. Go ahead and choose the conditional rules for your payments.
Email Notification
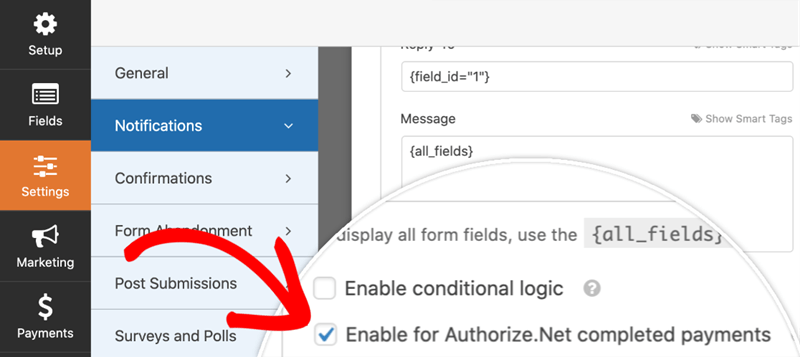
WPForms send an email notification to the users as they submit their form. So, if you don’t want to send the email until the payment is approved by Authroize.Net, check the box labeled Enable for Authorize.Net completed payments.
That’s it. You can set up Authorize.Net with WPForms by following the above-mentioned steps.
Conclusion – Hope you find our setup tutorial on the Authorize.net payment form. These payment forms will be Helpful in collecting recurring subscription payments and normal online payments like donations too. So In my recommendation, you must get a copy of WPfroms.

